WebP Images: Saving precious kilobytes
WebP is an image format developed by Google in 2010. It was designed as a replacement for JPEG, PNG, and even animated GIF.
Using WebP can significantly boost your site's performance without sacrificing image quality. That's why we recommend WebP to all clients as a safe bet.
WebP supports nearly everything we want from web images:
- Lossy (like JPEG) and lossless (like PNG) compression.
- Transparency and semi-transparency (alpha channel like PNG).
- Animations similar to GIFs.
WebP achieves such data-reduction efficiency by leveraging VP8 video codec technology. The result is far more efficient compression than older formats like JPG, PNG, or GIF.
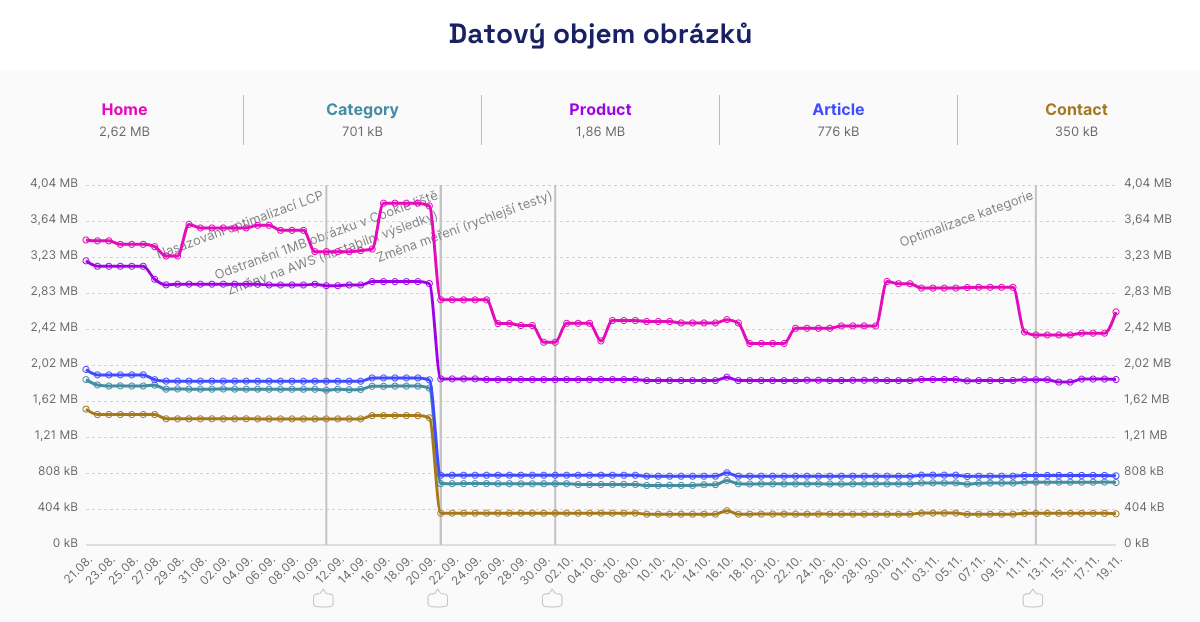 WebP can deliver a noticeable reduction in image data size. Source: Technical Report in Monitoring PLUS.
Why use WebP?
Using WebP images speeds up websites:
- Faster loading WebP images are typically 25–34% smaller than JPEG or PNG, improving load times and the LCP metric.
- Data savings Particularly benefits mobile users on slower connections.
- Compatibility WebP is supported in all major browsers, including Safari (from version 14). No fallback solutions are needed.
How to deploy WebP on the web?
Ideally automate the process and serve properly compressed images. There are several ways to deliver WebP:
-
Automatic WebP conversions Use tools like cwebp, ImageMagick, and similar libraries to generate WebP on your own server. When an image is uploaded or imported, it is compressed to the appropriate WebP format and quality. Compression can also be applied on demand; the image is created on the first browser request, which may be slower.
-
Enable WebP in the cloud Many cloud solutions, such as [Cloudflare], support on-the-fly WebP conversion. Many also support the newer AVIF, which isn’t as widely supported yet. The advantage is you don’t have to manage space on your own server—the cloud picks the most optimal format.
-
Manual conversion to WebP For smaller static sites, manually compress images to WebP using tools like Squoosh or directly in Photoshop.
Our take: how to set quality?
Tuning compression quality can be tricky, so we share our experience from web-speed consulting.
Quality settings vary depending on how you use images on the site. For example:
- In product thumbnails in category listings on e-commerce sites, 70–80% quality is usually enough.
- If you’re selling cameras and want to show true photo quality, aim for 85–90% WebP quality.
We always recommend dedicating some time to optimizing compression. Do two things:
- Testing Take several typical images from your site. Experiment with tools like TinyPNG or Squoosh and monitor the quality–size ratio.
- Choose the optimal quality level A quality range of 70–90% is recommended for lossy compression. Lossless is suitable for graphics with sharp edges (previously PNG) or detailed photos.
Final tip: Always monitor image data sizes. Our experience shows that changing even a single image, such as the homepage hero, can cause noticeable speed fluctuations:
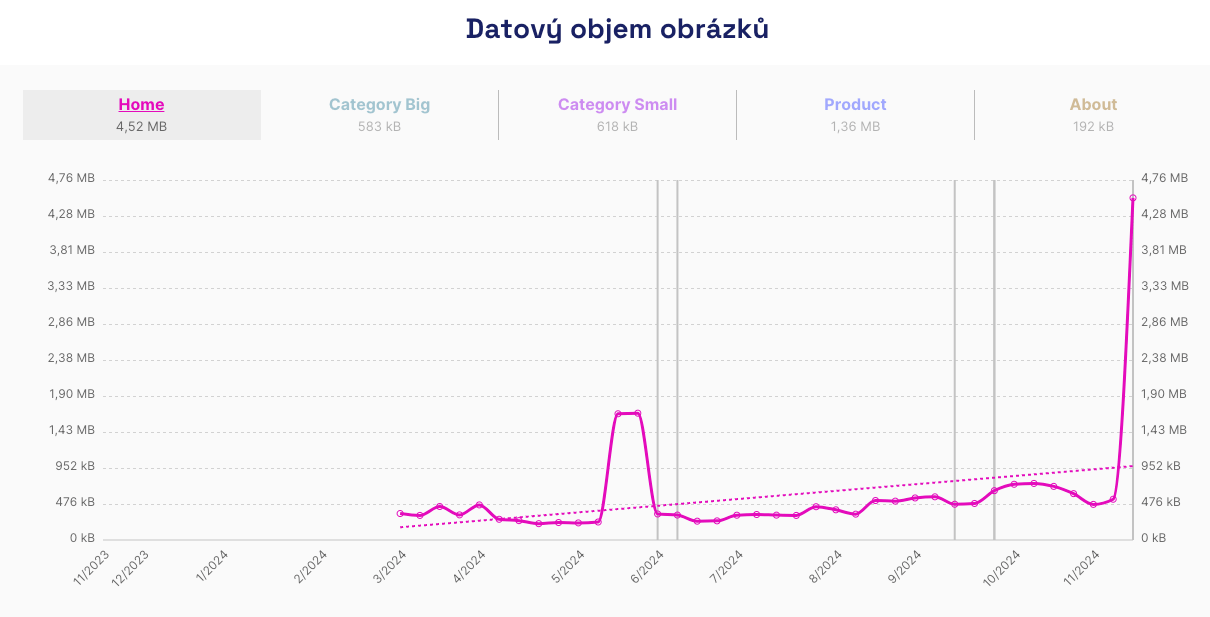 Timely detection of an issue caused by a 4 MB image on the homepage. Source: Technical Report in Monitoring PLUS.
Here you’ll find more tips for web-image optimization.